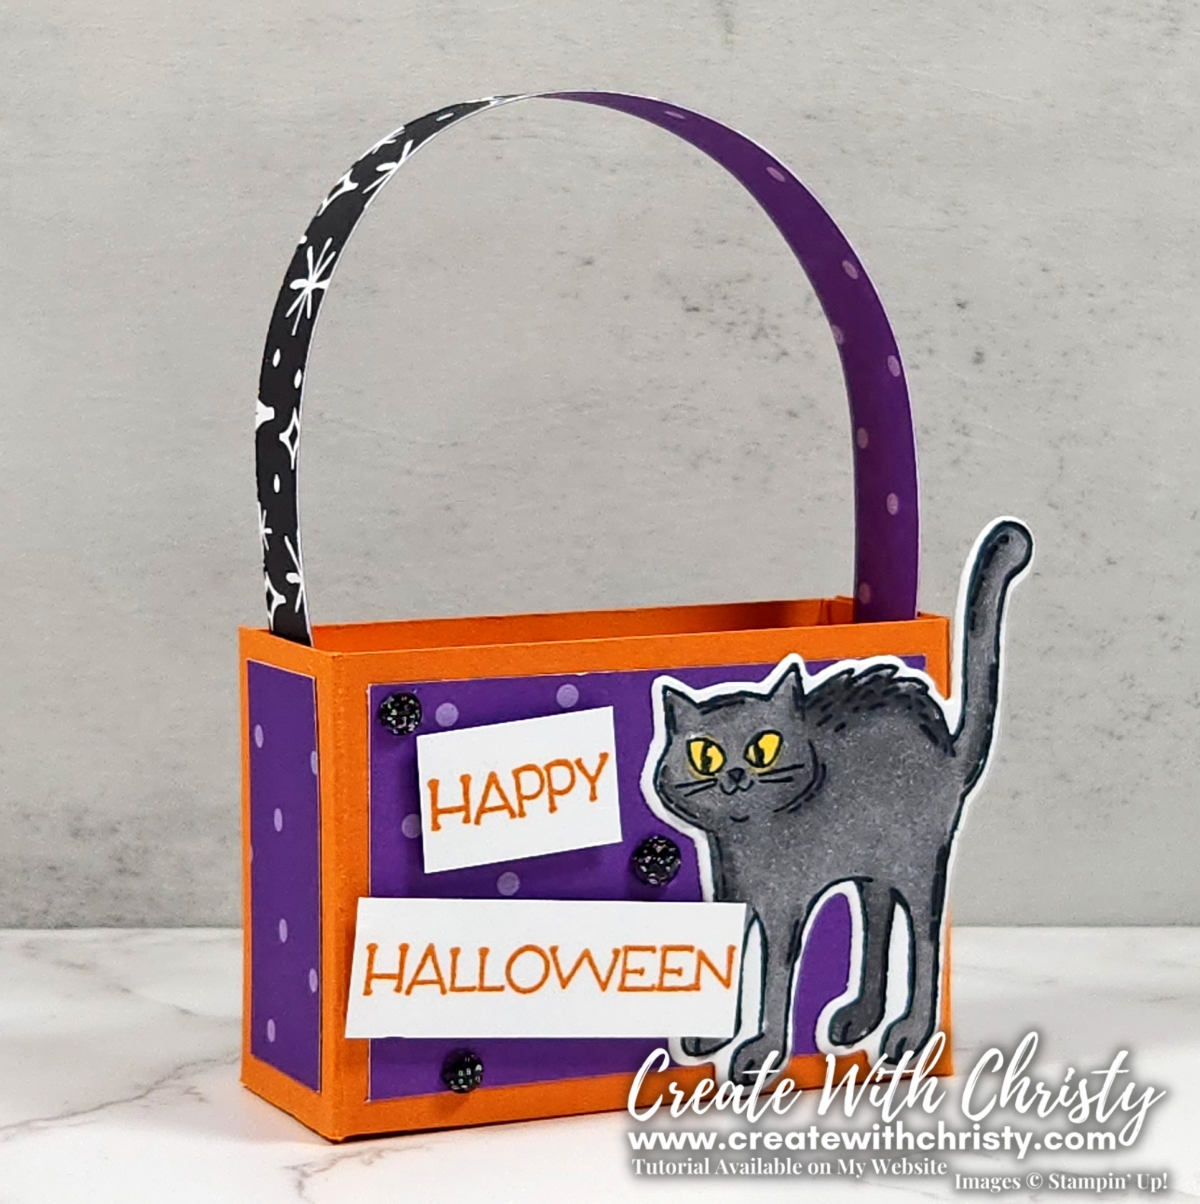
Welcome to the One Stamp At a Time Blog Hop! I'm so glad to have you here at Create With Christy! This month, our theme is Pumpkins, Pies, and Frights. We needed to make either Fall or Halloween projects. As you can see, I chose to make a Halloween card & coordinating treat holder.
My post today is also for my 12 Weeks of Fall & Halloween for Week #3. During my series of projects, I'm making 3D or fun fold cards for Halloween & Fall. The treat holder is the one I made for my Halloween projects for my 12 Weeks of Fall & Halloween.
You Can Learn How to Make My Milk Duds Halloween Treat Holder in My Video...
Click "Watch on YouTube" if You Would Like to See it in HD
My card & treat holder feature the Potions & Spells Bundle from the Stampin' Up! Online Exclusives. Not only are there great images in the bundle's stamp set, the die-set it wonderful, too. I didn't use them on my treat holder, but there are some great stand-alone dies that give you more fun things to add to the stamped die-cuts. You will see a couple of these dies used on the card below.
I had some snack-size Milk Duds, and I put them side-by-side. Then, I took some measurements and came up with this treat holder. I may have specifically made this for the Milk Duds, but there are definitely more treats that can fit inside. The inside measures 2-1/2" wide x 1-3/4" high x 1" deep.
I talked about the stand-alone dies in the Potions & Spells Bundle above, and you can see two of the dies in action. The bubbles and the drips on the top of the kettle were made with them. The four bubbles were actually die-cut using one die.
I used a new Designer Series Paper (DSP) pack on both the card and the treat holder, and it's called Halloween Spells DSP. It's from the new Holiday Scrapbooking Brochure. I used the Gorgeous Grape polka dot design on both the card and the treat holder, but on the card, I also used a couple of the stamps in the stamp set to add some more designs to it. The handle on the treat holder is the same piece of paper...I just used the other side. The bubbles and the drips were die-cut from another design in the DSP pack.
I wanted a little bling on both of my projects, and I chose to use the black gems from the Adhesive-Backed Sparkle Gems.
For the inside of my card, I put the three bubble stamps onto one acrylic block, and then stamped them across the bottom of the Basic White layer using Pumpkin Pie ink.
I didn't make this card in the video above, but I have written a tutorial for it. The way to get this free tutorial is to join my Create With Christy's VIP Stampers Facebook Group. Anyone can now join this group page. When you're on the group page, click "Join", and then agree to the group rules. Once I get notification of you agreeing to the rules, I'll approve your request to join. You'll find the tutorial in the "Guides" section of the page under "2024 Exclusive Written Tutorials."
Click Here to Join My VIP Stampers Facebook Group
Dimensions (CS = Cardstock):
- Pumpkin Pie CS: 4-1/2" x 4-1/2"
- Score the piece at 1" & 3-1/2"
- Rotate 90 degrees, and score at 1-3/4" x 2-3/4"
- Basic White CS: 2" x 2-1/2" (cat)
- 2-1/2" x 1/2" (sentiment)
- Halloween Spells DSP: (2) 2-1/4" x 1-1/2" (front & back pieces)
- (2) 3/4" x 1-1/2" (both side pieces)
- 6" x 1/2" (handle)
- Sparkle Gems: 1 large & 2 small black gems
Dimensions:
- Granny Apple Green CS: 8-1/2" x 5-1/2" (card base)
- Pumpkin Pie CS: 4" x 5-1/4" (base layer)
- Basic White CS: 5-1/2" x 2-3/4" (kettle & cat)
- 2-1/2" x 1/2" (sentiment)
- 4" x 5-1/4" (inside layer)
- Halloween Spells DSP: 1-1/2" x 5-1/4" (Gorgeous Grape polka dots)
- 2-1/4" x 2" (drips & bubble die-cuts)
- Sparkle Gems: 1 small & 2 large black gems
Don't Miss Everyone Else's Great Projects...
Join the Blog Hop!
To join the hop, and see the other fabulous creations, click on the names below. If you're reading this in an email - you'll need to click HERE to go to my blog and scroll down until you see the blog hop list.
************************


So adorable Christy! Love the use of the Halloween DSP for your bubbles in your cauldron! Your little scaredy cat is so cute too and looks a little sparkly, maybe wink of stella on him? Thanks for the inspiration!
ReplyDeleteAw, thanks, Tina! As soon as I saw the bubble paper, I knew I needed to try it with the cauldron. I only used blends on the cat, but Wink of Stella would have looked great!
DeleteThanks for sharing your adorable Halloween projects! Love the color palatte!
ReplyDeleteThank you so much, Melissa! I'm so glad you like them. 😊
DeleteSuch cute projects. Thanks for your help in getting me hopping again. I’ve really missed it.
ReplyDeleteThank you so much, Renee! You are so welcome! I'm really glad you can hop with us again!
DeleteI commented once without my name 🤦🏼♀️. Not at my computer and mobile of course looks different. 😂
ReplyDeleteI thought it was you, Renee. 😉
Delete