Welcome to the One Stamp At a Time Blog Hop! I'm so glad to have you here at Create With Christy! We blog hop every month, and this month, our theme is Here We Go - Projects that feature Vacation, Back to School, New Home, New Place, Etc.
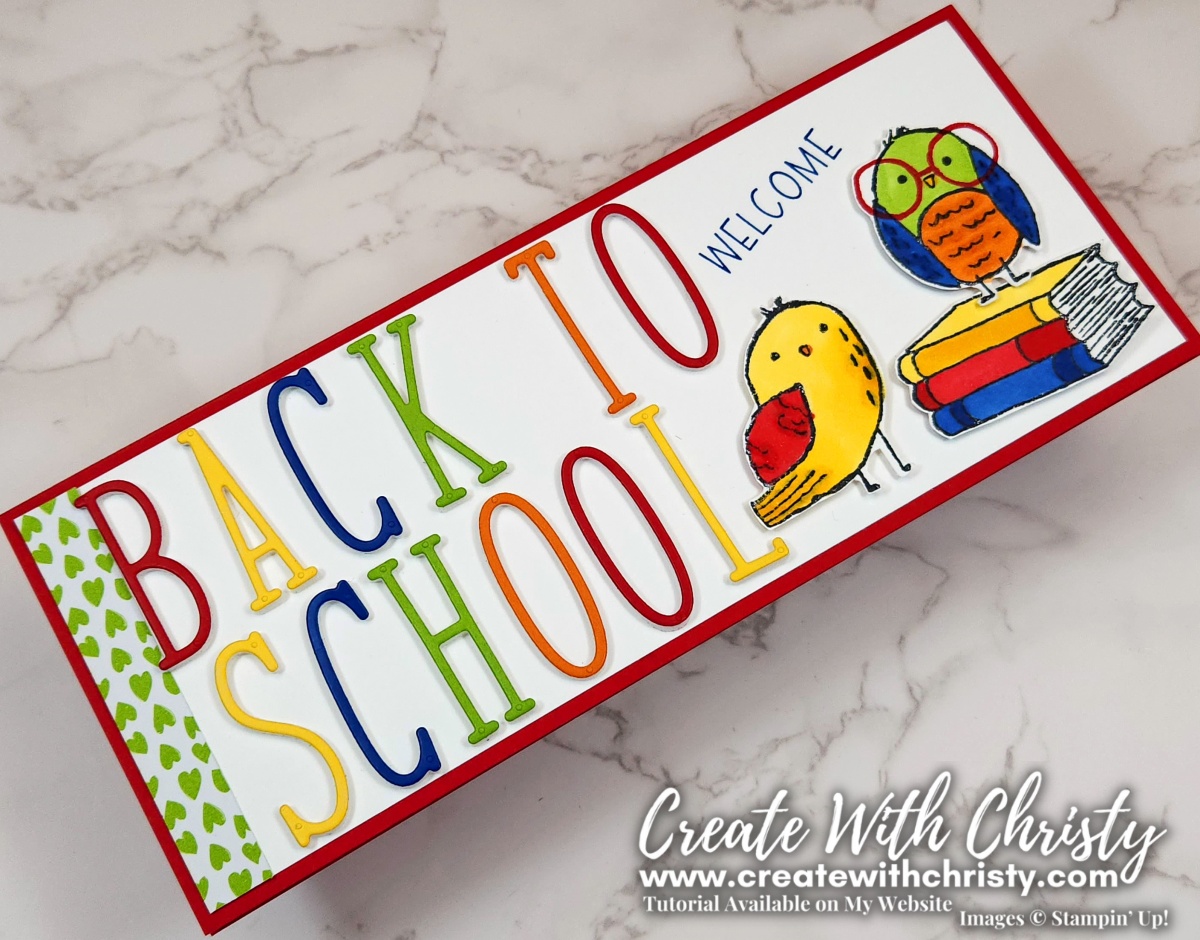
I chose to make some Back to School projects. My slim card & pencil case wrap feature the super cute Bird's Eye View Stamp Set & Alphabet A La Mode Dies.
This is the first time I've used the Alphabet A La Mode Dies, and I'm glad I finally got to play with them. When I decided to spell out "Back to School" with them, I knew I didn't want the letters to be flat on the card. I wasn't sure how I was going to do it until I remembered about the Foam Adhesive Sheets. These adhesive sheets are a perfect way to pop up die-cuts that are too small for Mini Stampin' Dimensional and Foam Adhesive Sheets.
Here's how the Foam Adhesive Sheets work:
- Figure out the size of cardstock/paper you need
- Cut a piece of the Foam Adhesive Sheets the same size
- Remove the paper backing off of one side of the Foam Adhesive Sheet, and attach the cardstock to it.
- With the cardstock side facing up, put the die on top of it, and die-cut it just like you normally do, using the same, regular sandwich of plates as regular die-cutting.
- Remove the other paper backing and attach to your project.
I wasn't sure if I had a stamp set that would work with my back to school theme, but then I remembered the Bird's Eye View Stamp Set. I knew the cute birds and the stack of books would be perfect. Of course, I had to add glasses to one of them. I absolutely love this stamp set.
After I stamped and colored the birds, I fussy cut them out and attached them to the right side of the card with Stampin' Dimensionals.
I did one of my Card Class @ Homes featuring this stamp set a couple months ago. The card kits are no longer available, but...
You Can Watch the Free Bird's Eye View Card Class @ Home Video by Clicking Here
I always decorate the inside of my cards, and I just had to stamp my cute, little scholarly bird onto it. By the way, I colored my birds and the books on the front and inside of my card with Stampin' Blends. You can get the list of the colors in the supply list below.
I had a little case of pencils, and I added a cute little cardstock band to it so it would coordinate with my card. The card and coordinating pencil set are perfect to give both students and teachers for "Back to School". Yes...there's my cute little birdy again. 😍
In case you're wondering where the "Welcome" stamp on the card & my pencil case band came from, it's from the Warm Welcome Stamp Set.
Dimensions (CS = Cardstock & DSP = Designer Series Paper):
- Real Red CS: 8-1/2" x 7" (card base)
- With 7" along the top, score @ 3-1/2"
- Real Red CS: 5-1/2" x 1" (letters)
- Daffodil Delight CS: 5-1/2" z 1" (letters)
- Blueberry Bushel CS: 3-1/2" x 1" (letters)
- Granny Apple Green CS: 3-1/2" x 1" (letters)
- Pumpkin Pie CS: 3-1/2" x 1" (letters)
- Basic White CS: (2) 8-1/4" x 3-1/4" (outside & inside layers)
- 6" x 2" (birds & books)
- Adhesive Sheets for Letters: (2) 5-1/2" x 1"
- (3)3-1/2" x 1"
- Brights 6" x 6" DSP: 1/2" x 3-1/4"
Dimensions:
- Real Red CS: 6" x 1-1/4" (band base)
- Brights 6" x 6" DSP: 6" x 1"
- Daffodil Delight CS: 3" x 2" (circle)
- Basic White CS: 2-1/2" x 2" (bird & welcome)
Don't Miss Everyone Else's Great Projects...
Join the Blog Hop!
To join the hop, and see the other fabulous creations, click on the names below. If you're reading this in an email - you'll need to click HERE to go to my blog and scroll down until you see the blog hop list.
************************


Adorable projects! So colorful!
ReplyDeleteThank you so much, Melissa! I'm glad you like them.
DeleteCuteness overload!! Love it!!
ReplyDeleteAw, thank you so much! I love these birds. They're so adorable!
DeleteChristy, this is adorable!! I love all the color!! Very fun!
ReplyDeleteOh, my goodness...I totally missed your comment, Ann! Thank you so much! I'm glad you like it.
Delete