


Welcome to the One Stamp At a Time Blog Hop! I'm so glad to have you here at Create With Christy! We blog hop every second Thursday of the month, and this month, our theme is Shabby and Chic. We could make a Boho Chic or Shabby Chic, and I opted for Shabby Chic.
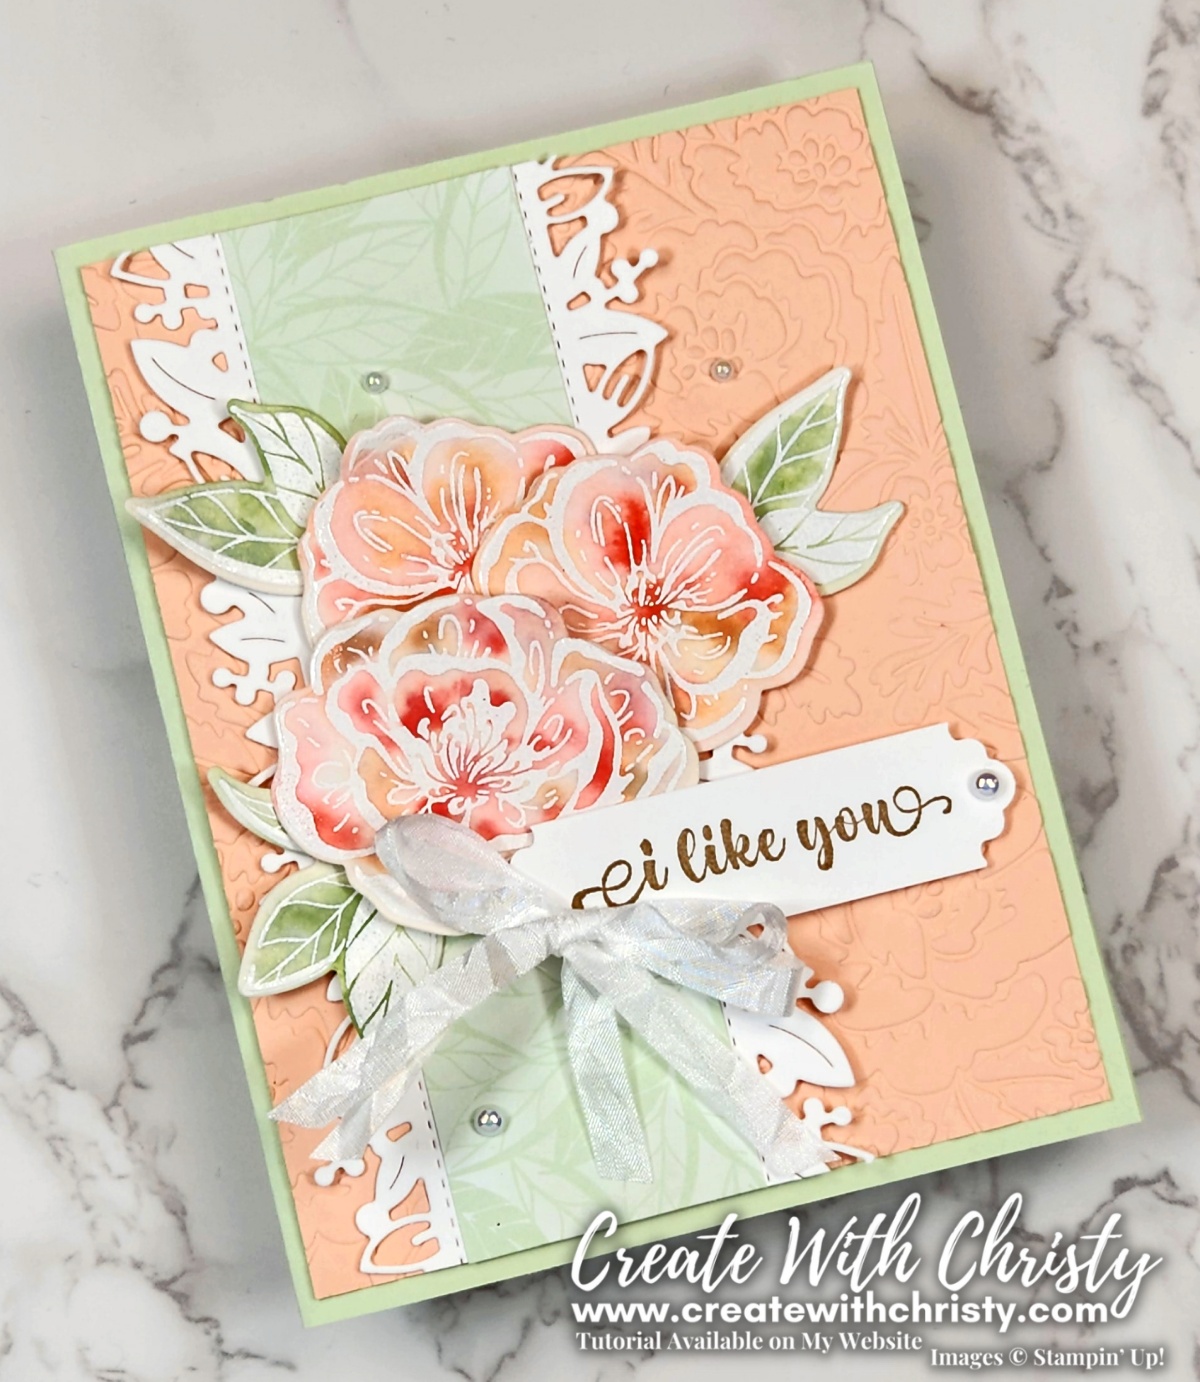
I decided to use a brand new bundle Irresistible Blooms Bundle and it's coordinating Hello, Irresistible Designer Series Paper (DSP). This is a sneak peek of these products, and they're part of the new Online Exclusives that will come out every once in awhile throughout the year. This batch will be available to customers March 1, 2023. I love being a demo, because I was able to get some of the new stuff early!

You Can Learn How to Make Both of My Projects in My Video...
Click "Watch on YouTube" if You Would Like to See it in HD
Speaking of the sentiments, I got a punch out that I haven't used for awhile. It's called the Lovely Label Pick a Punch, and you can find it in the 2022-2023 Annual Catalog. I thought the way it punched the end of my sentiment piece looked perfect for the Shabby Chic look.
The Hello Irresistible DSP is gorgeous, too! If you look closely at the DSP strip, the leaves in the design coordinate perfectly with the leaves die-cuts on the card. When I get my video finished, I'll show all of the designs at the beginning of the video. You're going to love it!

I used a few more annual catalog products on this card, too. I knew that I wanted to emboss the base layer, and the first embossing folder that came to mind for my Shabby Chic look was the Pretty Flowers Embossing Folder. The flowers in the embossing also look a lot like the flowers in the bundle.
I also brought out some dies I haven't used for awhile called Eden Dies. I used the long border die in this set so I could have a die-cut border along both sides of the DSP strip. Again...the shabby chic look.
The Eden Dies are a part of the bundle called the Eden's Garden Bundle. This bundle is now a part of Sale-A-Bration this month! Place at least a $100 order (before shipping & tax), and you can get this bundle FREE! Hurry, Sale-A-Bration ends February 28th!

I used a special technique on the stamped flowers and leaves that I haven't used for years. It's called Floating Reinkers, and it's so easy to do! If you haven't done this before, make sure watch my video above.
I topped the card off by adding a double bow using the White Crinkled Seam Binding Ribbon and added some Iridescent Pearls Basic Jewels. Both of these are from the annual catalog, too.

I stamped the larger flower onto the bottom, left corner of the inside layer, and added one of the sentiment stamps from the same stamp set. This one show both of the fonts in the stamp set.

I made a little gift tag to coordinate with my card. The base of the tag was made with the Something Fancy Dies in the Mini Catalog.
I used the same Floating Reinkers technique on the flower and leaves on my tag, too. I like making a double bow with the Crinkled Seam Binding Ribbon. Making is a double bow makes it a little more frilly looking, and goes well with the Shabby Chic vibe.

Dimensions (CS = Cardstock):
- Soft Sea Foam CS: 8-1/2" x 5-1/2" (card base)
- Petal Pink CS: 4" x 5-1/4" (embossed base layer)
- Basic White CS: (2) 1" x 5-1/4" (die-cut borders)
- 2-3/4" x 3/4" (sentiment)
- 3-7/8" x 5-1/8" (inside)
- Shimmery White CS: 5-1/4" x 4-1/2" (flowers & leaves)
- Hello, Irresistible DSP: 1-1/2" x 5-1/4"
- White Crinkled Seam Binding Ribbon: 24"
- Iridescent Pearls: 2 large & 2 small

Dimensions:
- Soft Sea Foam CS: 2-1/2" x 3-1/2" (tag)
- Basic White CS: 2" x 1" (border die-cut)
- 2-1/4" x 3/4" (sentiment)
- Shimmery White CS: 3-3/4" x 2" (flower & leaves)
- White Crinkled Seam Binding Ribbon: 24"
- Iridescent Pearls: 2 small & 1 large
Don't Miss Everyone Else's Great Projects...
Join the Blog Hop!
To join the hop, and see the other fabulous creations, click on the names below. If you're reading this in an email - you'll need to click HERE to go to my blog and scroll down until you see the blog hop list.


************************

Don't Miss My Newest Card Class @ Home Live Video TONIGHT
@ 7:30 pm (ET)!
Click on the Picture to Find Out How You Can Get The Card Kits FREE!


Click on the Picture Above To Find Out More And to Subscribe


Beautiful projects. Makes me want this set.
ReplyDeleteThank you so much, Renee! This is the first time I've used it, and I really like it.
DeleteYour card and tag are STUNNING!!!
ReplyDeleteAw, thank you so much, Melissa! I'm so glad you like them.
DeleteSuch a beautiful card! And I can’t wait to try the technique you used on the flowers and leaves!
ReplyDeleteThank you so much! I'm really glad you like it. I hope you have fun trying the technique.
Delete