


It's time for another Short & Sweet Saturday card! Today, I used the host-exclusive stamp set, Pun Intended. The only way to get this cute stamp set is to host a workshop or place at least a $150 order (before shipping & tax). There are three options of workshops I offer...in-home workshop, catalog/online order workshop, and a Facebook workshop. If you're interested in hosting a workshop, please contact me. If you're interested in placing an order, you can do so at my ONLINE STORE.
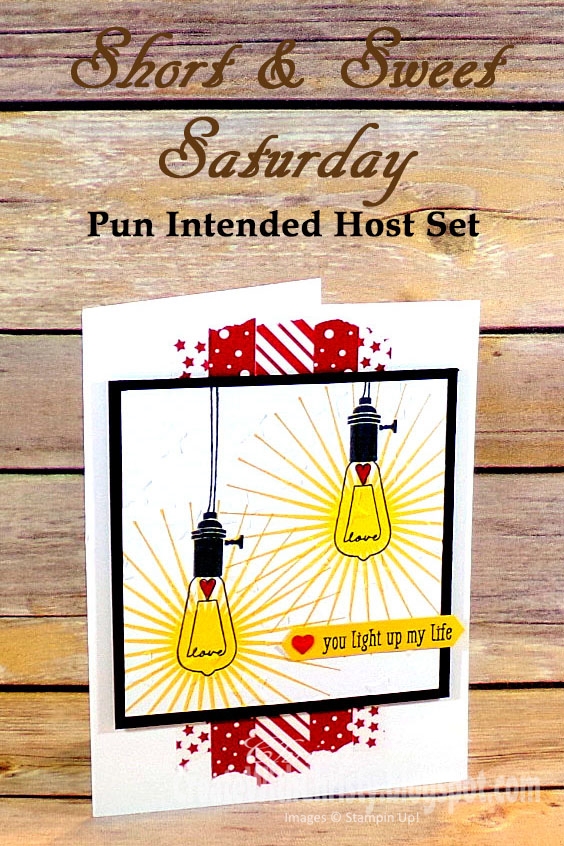
I also used the Kinda Eclectic Stamp Set and the Candy Cane Lane Designer Washi Tape. Yes, this washi tape can be used for more than just Christmas projects!
All of my Short & Sweet Saturday (S&SS) cards are quick and easy to make, so they're perfect if you need to make a card last minute. I always include complete instructions on how to make my Short & Sweet cards, too.

- Fold an 8-1/2" x 5-1/2" piece of Whisper White Thick Cardstock in half to form the card base.
- Put a strip of the diagonal-striped tape from the Candy Cane Lane Designer Washi Tape up & down the center of the card base. Put a strip of the Real Red/Whisper White dots tape on each side of the diagonal-striped one. Attach the Real Red stars tape on each side of the dotted strips. Make them all a little different in length.
- Stamp the sunshine stamp from the Kinda Eclectic Stamp Set onto the bottom left and top right of a 3-1/2" x 3-1/2" piece of Whisper White Cardstock using the Crushed Curry Classic Stampin' Pad.
- Stamp the light bulb stamp from the Pun Intended Stamp Set on top of each sunshine using the Tuxedo Black Memento Pad. Make sure to line up the bulb with the center of each sunshine. Color the hearts in the light bulbs with the Real Red Marker from the Brights Stampin' Write Markers
- Emboss the stamped layer with the Lucky Stars Textured Impressions Embossing Folder. Attach it to a 3-3/4" x 3-3/4" piece of Basic Black Cardstock. Then, attach it all to the center of the card with Stampin' Dimensionals.
- Stamp the "you light up my life" stamp onto a scrap piece of Crushed Curry Cardstock using the Memento Pad. Punch the greeting out with the Classic Label Punch, making sure the greeting is on the right side of the label. Attach the label to the bottom right of the stamped piece. Then, attach a Real Red enamel heart from the Brights Enamel Shapes to the left side of the label.


