I'm so sorry that I missed my Short & Sweet Saturday (S&SS) last week. Last week was super crazy for me, and I ran out of time to get it made. Thankfully, I was able to make one this week!
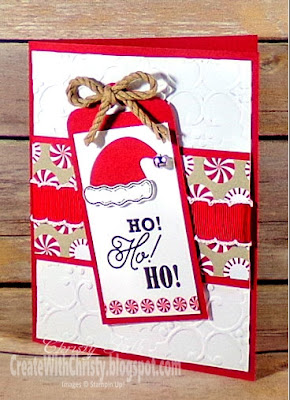
This week's S&SS card features the Jolly Friends Bundle. The bundle includes the Jolly Friends Stamp Set and the Jolly Hat Builder Punch. Buying these two items as a bundle saves you 10%! I also used the stamp set, Greetings from Santa.
All of my Short & Sweet Saturday (S&SS) cards are quick and easy to make, so they're perfect if you need to make a card last minute. I always include complete instructions on how to make my Short & Sweet Saturday cards, too.
- Fold an 8-1/2" x 5-1/2" piece of Real Red Cardstock in half to form the card base.
- Emboss a 4" x 5-1/4" piece of Whisper White Cardstock running it through the Big Shot Die-Cutting Machine with the Holly Textured Impressions Embossing Folder.
- Attach a 4" x 2" piece of peppermint candy paper from the Candy Cane Lane Designer Series Paper (DSP) across a 4" x 2-1/4" piece of Real Red Cardstock. Then, attach this across the center of the Whisper White, embossed layer.
- Wrap a 6" piece of Real Red 3/4" Stitched Edge Ribbon around the center of the DSP strip, and attach the ribbon ends to the back of the Whisper White, embossed layer. Then, attach the whole thing to the Real Red card base.
- Punch a short end of a 2" x 4-1/4" piece of Real Red Cardstock with the Scalloped Tag Topper Punch to make a tag. Set aside.
- Wrap a 5" strip of peppermint candy tape from the Candy Cane Lane Designer Washi Tape around the bottom of a 1-3/4" x 3-1/4" piece of Whisper White Cardstock, wrapping the edges of the tape around to the back. Stamp the "Ho! Ho! Ho!" stamp from the Greetings from Santa Stamp Set above the washi tape, using the Early Espresso Classic Stampin' Pad.
- Punch the top of the Santa hat from a scrap piece of Real Red Cardstock using the Jolly Hat Builder Punch. Attach it to the top, center of the Whisper White piece. Stamp the outline hat trim stamp from the Jolly Friends Stamp Set onto a scrap piece of Whisper White Cardstock using the Early Espresso pad. Punch it out with the Jolly Hat Builder Punch. Attach it to the bottom of the Santa hat using Stampin' Dimensionals.
- Attach the stamped piece to the bottom, center of the Real Red tag. Then, attach it to the center of the card, at an angle, using Stampin' Dimensionals. See pictures for placement.
- Attach a silver bell from the Mini Jingle Bells onto the tip of the Santa hat with a Mini Glue Dot. Tie a 9" piece of Kraft Rope Trim into a bow, and attach it to the top of the tag with a Mini Glue Dot. Trim the rope ends so they're just above the Santa hat.


